northernelectric.ca main index < kites<
This plan is at http://www.richmondairforce.com/Files/DTplans.pdf , courtesy of The Richmond Airforce. It's quite detailed. There is an update with minor modifications in the works, but this version (as of August 2009) works fine. Also see the discussions at the kitebuilder.com forum: DT delta design and the plans review thread Delta Box Kite - Alex and Charlie Dunton.
Carbon fibre rods, 0.75 oz ripstop nylon (Hot Green, Hot Orange, and Black), and the black 3.9 oz. Dacron all came from Kite Studio.
First, some mods I made to the plan:
|
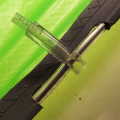
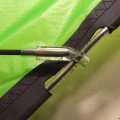
Since it would take weeks for factory-made sport kite fittings to arrive, I decided to make my own. (Hence the "Do It Yourself".) These each were fabricated from two pieces of polyurethane tubing, the same stuff that is used for aquarium air hoses. This is not a new trick in kite-building, except that I was dealing with two different diameters of framing rods.
The thicker tubing is 1.25" (32 mm) long, with an inside diameter of 0.188" (4.8 mm) and an outside diameter of 0.312" (7.9 mm). I punched a small hole across the end with a leather punch, 1/4 inch from the end. The hole was only about 1.8 mm in diameter, but was able to stretch wide enough to take the leading edge spar.
The thinner tubing is 1.24" (32 mm) long, with an inside diameter 0.125" (3.2 mm) - which is a snug fit for the spreader rod - and outside diameter of 0.187" (4.7 mm) - which is an ever snugger fit inside the larger tubing. It was so tight that I could only push it in half way, and then pull it from the other end with needle-nosed pliers. I purposely left part of the smaller tubing sticking out so that it would be easier to start insertion of the spreader rod. I could have used cyanoacrylate glue to glue the two tubing pieces together permanently, but it didn't seem necessary.
My logic behind using two different sizes of tubing was to have a tight fit for the spreader rod (and it really is tight); and to have a thicker, stronger end section where the leading edge spar passes through it.
The other two pieces of thin tubing are just there as spacers to keep the fitting centred in the spar tunnel cut-out. They do not pass through the larger tubing, and they are not glued to anything. |
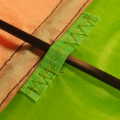 |
A strip of ripstop folded and sewn to give a 1.5 inch long tab with a 1/2 inch gap to pass the spreader rod through. There is one on each wing near the rear box panel. They prevent the spreader rod from bowing out and away from the back of the kite, but it is still easy to insert and remove the spreader rod. I'm surprised that there isn't something like this mentioned in the official plans.
update August 2010: One time I had forgotten to pass the spreader bar through the tabs. The wind was stronger than usual, and the wings started flapping in an alarming way. I hauled it down, re-installed the spreader through the tabs, and it behaved much better. |
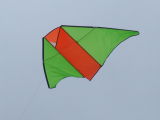
First flight on a long line, August 30, 2009. Reported weather conditions: winds W 15 km/h (just about ideal), overcast, and relative humidity at 80-85% .
The "hotness" of the green and orange fabrics don't really come through in the photos, probably from being lit mostly from the top, and it was overcast. I exercised some truthiness and bumped up the saturation a bit in The Gimp.
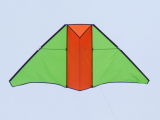
Front face, almost directly overhead. |
The edge of the triangular insert on the back of the box is visible, showing a bit of the white that makes up most of the back of the box. |

View from downwind. More of the white fabric is visible here. |
I was able to launch it from my hand, and it very quickly pulled out 220 feet of the 100 pound test braided polyester flying line. It certainly didn't need that heavy a line, but it's nicer to handle than thinner line. After I stopped it from taking any more line, it went straight overhead, but did not overshoot and nose over. Soon it found it's place (still at a fairly high angle above ground) and pretty much stayed there, moving slowly side to side or climbing and dropping as the wind changed direction and speed. It was amazing, and flew "as advertised".
After taking some photos and before getting ready to pack up, I tried a few experiments to test the kite's stability. I tried pulling in several yards quickly, but could only make it overshoot once, and could not repeat it.
When I released the extra line, it would pitch and yaw a little bit, but stayed upright in a glide. The only time it looped to one side was when I was walking it down, and I there was only about 50 feet of line left. Finally, I pulled in all but the last 60 feet of line and let it the rest of it lay on the ground (grass, about 8-12" long) spread out in a zigzag pattern in front of the stake it was tied to. After it settled to the new position I let go of the line completely. Instead of dropping to the ground the kite just started to drop slowly and glided backwards downwind, with only the line dragging through the grass, providing any resistance. By the time it pulled the full 220 feet out it was still about 20 feet off the ground and then it took off again, straight up.
Most impressive.
Something it will not do is relaunch itself on a long line if it lands on its back. You have to walk up and set it upright against a support, or balance it on the wingtips. It might relaunch if it lands on its front, but I haven't had enough time flying it to prove it one way or the other.
- Hot-cutting edgebinding strips out of ripstop nylon scraps is worth the effort, compared to buying pre-folded bias tapes. It goes much faster than doing a double-rolled hem, and simplifies making the template since there is no hem allowance.
- Non-toxic water-soluble white adhesive from a glue stick will temporarily hold edge binding strips in place while sewing. It can be re-positioned, and you can wipe off excess glue with a damp rag. It did not clog my needle.
update, August 2010 - It performed very well during the Dieppe (Canada) International Kite Festival 2010 on a few days when there was nearly no wind. Using a long launch on something like 115 meters of 50# line, it went up and stayed up, riding thermals all day.
Shortly before the Festival, I discovered that one of the wing spars punched out through a wing tip, even though it had an end cap. I had to apply a small external patch of 3.9 oz dacron with cyanoacrylate glue and a few stitches.
Update, Spring 2011: It's lost, somewhere. I can't find it now. So sad.
northernelectric.ca main index < kites<


